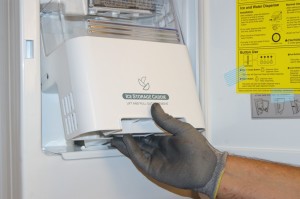
If your KitchenAid refrigerator’s ice bin is full and you need to remove it to make more ice, follow these simple steps. First, open the freezer door and locate the two screws on the top of the ice bin. Use a Phillips head screwdriver to remove these screws.
Next, lift the ice bin up and out of the freezer. Be careful not to spill any ice as you remove it. Finally, empty the ice into a storage container and return the bin to the freezer.
Screw the two screws back in to secure the bin in place.
- Remove any food or other items from the ice bin
- Lift the ice bin out of the freezer compartment
- Turn the ice bin upside down and twist to release the ice
- Empty the ice into a trash bag or other container
- Rinse the ice bin with warm water and soap
- Dry the ice bin with a clean towel
- Replace the ice bin in the freezer compartment
Credit: manuals.plus
How do I remove the ice bin from my Kitchenaid refrigerator
If your Kitchenaid refrigerator has an ice bin that needs to be removed, there are a few things you need to do. First, locate the two screws that hold the ice bin in place. These screws are usually located on the top of the ice bin.
Once you have located the screws, remove them with a Phillips head screwdriver.Next, locate the release button for the ice bin. This button is usually located on the front of the ice bin.
Press the release button, and then pull the ice bin out of the refrigerator.If your ice bin is stuck, you may need to use a putty knife or a flat head screwdriver to help pry it loose. Once you have removed the ice bin, you can clean it with warm, soapy water.
Be sure to dry the ice bin thoroughly before putting it back into the refrigerator.
Next, lift the bin straight up and out of the freezer compartment
If your fridge has an ice bin that sits on top of the freezer compartment, you’ll need to remove it before you can access the evaporator coils. To do this, start by unplugging your fridge and emptying the ice bin. Next, lift the bin straight up and out of the freezer compartment.
If there are any screws holding it in place, remove them before lifting the bin out. With the ice bin out of the way, you should be able to see the evaporator coils.
Kitchenaid removable ice bin stuck
If you have a Kitchenaid refrigerator with a removable ice bin, you may have experienced the ice bin getting stuck. This can be frustrating, but there are a few things you can do to try to fix the problem.First, make sure that the ice bin is completely empty.
If there is any ice left in the bin, it can prevent the bin from being removed. Once the bin is empty, try gently pulling on it to see if it will come loose. If the bin is still stuck, you may need to use a little force to get it out.
If you’re still having trouble, try running some hot water over the outside of the ice bin. This can help to loosen the ice and make it easier to remove.If you’re still having no luck, you can try contacting Kitchenaid for assistance.
They may be able to help you figure out what’s causing the problem and how to fix it.
Kitchenaid removable ice bin replacement
If your Kitchenaid refrigerator’s ice bin is cracked or otherwise damaged, it’s important to replace it as soon as possible. A damaged ice bin can cause leaks and other problems.Fortunately, replacing a Kitchenaid ice bin is a relatively easy process.
You can purchase a new bin from Kitchenaid or from a third-party retailer.Once you have your new bin, simply remove the old one by lifting it out of the fridge. Then, insert the new bin into the fridge and push it until it clicks into place.
That’s all there is to it! With a new ice bin in place, your Kitchenaid fridge will be back to working like new.
Kitchenaid ice bin latched vs unlatched
If you’re like most people, your refrigerator is one of the most used appliances in your home. And if you have a Kitchenaid refrigerator, you’re probably familiar with the ice bin. But did you know that there are two different types of ice bins?
The latched ice bin and the unlatched ice bin.So, what’s the difference? The latched ice bin is the more common type.
It has a latch that secures the bin to the fridge door. This prevents the bin from falling out when you open the door. The unlatched ice bin doesn’t have a latch.
Instead, it’s secured to the fridge door with two screws.The latched ice bin is the more convenient option. It’s easy to remove and replace, and you don’t have to worry about it falling out.
The unlatched ice bin is a bit more difficult to remove and replace, but it’s more secure.
Kitchenaid refrigerator ice bucket assembly
If your Kitchenaid refrigerator is equipped with an ice bucket assembly, it’s important to know how to properly care for it. Here are some tips:-The ice bucket assembly should be emptied and cleaned regularly.
-When emptying the ice bucket, be careful not to spill any water on the floor.-If the ice bucket is dropped, it could break. Inspect it regularly for cracks or damage.
-If the ice bucket is damaged, it will need to be replaced.
How to remove ice bucket from whirlpool refrigerator
If your Whirlpool refrigerator has an ice bucket that needs to be removed, follow these steps:1. First, remove the ice cubes from the bucket. You can do this by dumping them into a sink or container.
2. Next, locate the two screws that hold the bucket in place. These are typically located on the sides of the bucket.3. Using a Phillips head screwdriver, remove the screws and set them aside.
4. With the screws removed, the bucket should now be loose. Carefully lift it out of the refrigerator and set it aside.5. To replace the bucket, simply reverse the steps above.
Place the bucket back into the refrigerator and screw it in place.That’s all there is to it! Removing the ice bucket from your Whirlpool refrigerator is a quick and easy process.
How to remove ice bin from ge refrigerator
If your GE refrigerator is equipped with an ice bin, you may occasionally need to remove it for cleaning. Here are step-by-step instructions for removing your ice bin:1. Open the refrigerator door and locate the ice bin.
The ice bin is usually located on the top shelf of the refrigerator.2. Lift the ice bin straight up and out of the refrigerator.3. Empty the ice bin of any ice cubes.
4. Wash the ice bin with warm, soapy water. Rinse well and dry before replacing.5. To replace the ice bin, simply reverse the above steps.
How to remove ice bin from ge side by side refrigerator
If your GE side-by-side refrigerator is equipped with an ice bin, you may find that you need to remove it at some point for cleaning or repairs. Luckily, this is a relatively simple process that can be completed in just a few minutes.To remove the ice bin from your GE side-by-side refrigerator, start by turning off the power to the unit at the circuit breaker.
Next, locate the two screws that hold the ice bin in place and remove them.With the screws removed, you should be able to lift the ice bin out of the unit. If there is any ice stuck to the bin, you can use a hair dryer to melt it and make it easier to remove.
Once the ice bin is out, you can clean it as needed. Be sure to dry it completely before putting it back in the refrigerator. To reinstall the ice bin, simply reverse the above steps.
Whirlpool removable ice bin w10347100
If your ice maker is leaving behind large, clumpy ice cubes, it might be time to clean the ice bin. The Whirlpool Removable Ice Bin (W10347100) can be easily removed for cleaning. Simply twist the bin to release it from the ice maker.
Once the bin is removed, empty any ice cubes into a storage container. Next, use a mild soap and warm water to clean the bin. Avoid using harsh chemicals or scrubbing too hard, as this could damage the bin.
Once the bin is clean, dry it off and place it back into the ice maker. Your ice maker should now be able to produce smaller, more consistent ice cubes.
Conclusion
In order to remove the ice bin from your Kitchenaid refrigerator, you will need to first locate the release button. This is usually located on the back of the unit, near the top. Once you have found the release button, press it in and then pull the ice bin out.
If your model does not have a release button, you will need to use a flathead screwdriver to pry the ice bin out. Be careful not to damage the unit when doing so.
2 thoughts on “How To Remove Ice Bin From Kitchenaid Refrigerator – Easy Steps [2024]”